← Go back
Setting up SDL with Visual Studio 2019 (C++)
Setting up SDL in Visual Studio on Windows is a bit different than setting it up on Linux. So here is a little
guide on how to do it.
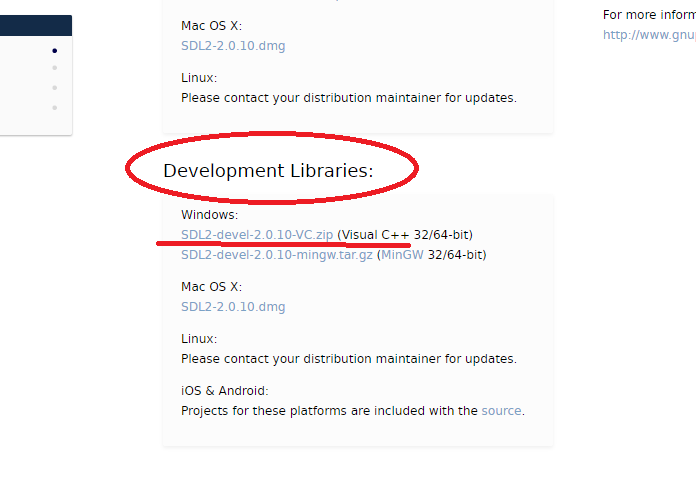
At first you have to download the development package that you want to use. At the time of this guide the
latest version was "SDL2-devel-2.0.10-VC.zip" as seen below.
 After downloading the package, you need to extract it to somewhere. I usually use "C:\Program Files
(x86)\programminglibraries\NAMEofLibrary" where "NAMEofLibrary" is the name of the library.
You will find atleast 3 directories "docs", "include", "lib". An offline documentation can be found inside the
"docs" directory.
Now comes the Visual Studio part.
My Visual Studio is in german but i'll try to translate the options and show everything with some
screenshots.
Open up Visual Studio and create a new Win32 or Console application
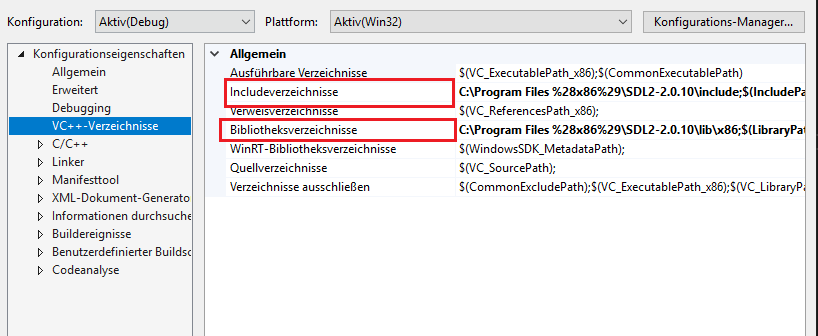
Go to Tools -> Options -> Configuration -> VC++ Directories
There we have to add includes and libraries. To do that you have to click on the text and add the paths in the
popup. Your SDL "include" directory has to
be added to the VC++ Include popup and your SDL "lib" directory has to be added to the VC++ Library popup.
After downloading the package, you need to extract it to somewhere. I usually use "C:\Program Files
(x86)\programminglibraries\NAMEofLibrary" where "NAMEofLibrary" is the name of the library.
You will find atleast 3 directories "docs", "include", "lib". An offline documentation can be found inside the
"docs" directory.
Now comes the Visual Studio part.
My Visual Studio is in german but i'll try to translate the options and show everything with some
screenshots.
Open up Visual Studio and create a new Win32 or Console application
Go to Tools -> Options -> Configuration -> VC++ Directories
There we have to add includes and libraries. To do that you have to click on the text and add the paths in the
popup. Your SDL "include" directory has to
be added to the VC++ Include popup and your SDL "lib" directory has to be added to the VC++ Library popup.
 Important steps!
Now we get to the steps that i have not seen anywhere else except in one burried StackOverflow post. Without
these SDL did not work for me on Windows.
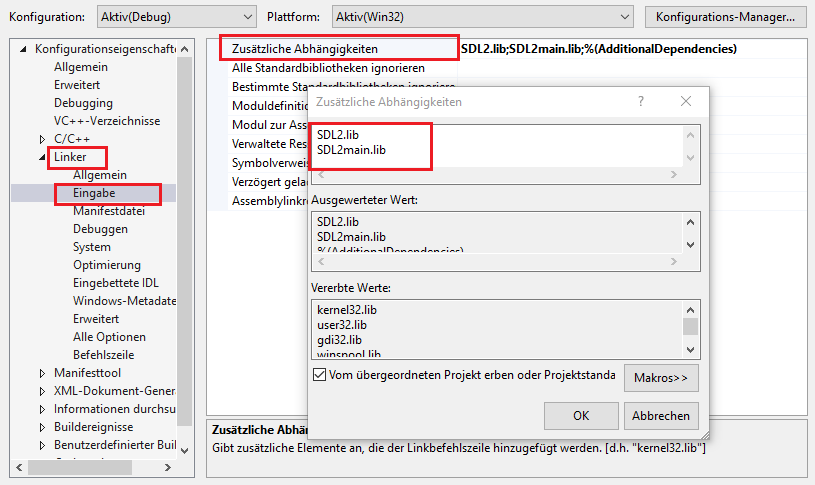
Go to "Tools -> Options -> Configuration -> Linker -> Input" and add
Important steps!
Now we get to the steps that i have not seen anywhere else except in one burried StackOverflow post. Without
these SDL did not work for me on Windows.
Go to "Tools -> Options -> Configuration -> Linker -> Input" and add
SDL2.lib
SDL2main.lib
to the Additional Dependencies
 Now you need to add the files "SDL2.lib" and "SDL2main.lib" of the SDL "lib" directory to your project. That
can be done by right-clicking the project -> add -> existing resource
After that you need to copy the "SDL2.dll" to your project directory.
Finally change your "int main()" to "int main(int argc, char* args[])" in your code.
Now you should be able to use the "SDL.h" include without an error.
Now you need to add the files "SDL2.lib" and "SDL2main.lib" of the SDL "lib" directory to your project. That
can be done by right-clicking the project -> add -> existing resource
After that you need to copy the "SDL2.dll" to your project directory.
Finally change your "int main()" to "int main(int argc, char* args[])" in your code.
Now you should be able to use the "SDL.h" include without an error.